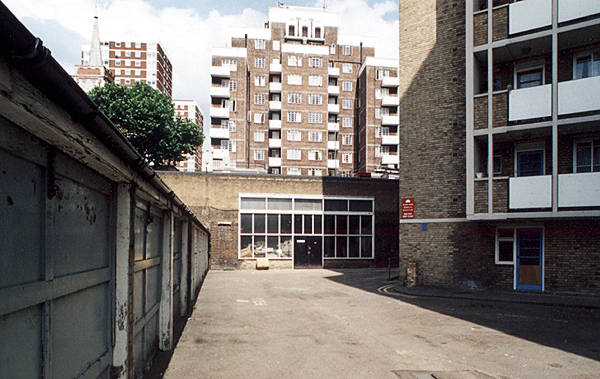
 The line diverged a quarter of a mile north of Addison
Road (now Olympia) station on the West London line, following
a semi circular route.
This photo is looking south at the line coming up
from Addison Rd. On the left, mainly obscured, is the existing
West London line. In the middle, the long-gone railway that caused
the row of houses on the right to be built following the line
of its divergence.
(photo: 2006)
The line diverged a quarter of a mile north of Addison
Road (now Olympia) station on the West London line, following
a semi circular route.
This photo is looking south at the line coming up
from Addison Rd. On the left, mainly obscured, is the existing
West London line. In the middle, the long-gone railway that caused
the row of houses on the right to be built following the line
of its divergence.
(photo: 2006)
|
|
Looking in the same direction but from slightly further
north, back toward the bridge that the above photograph was taken
from. The track area is clearly visible.
(photo: 2006)
|
|
Northern view from the above bridge, this photo shows
the West London line on the right and the route of the abandoned
line on the left, indicated by the left hand block of flats (actually
a hotel).
(photo: 2006)
|
|
The road on top of the bridge (Addison Gardens). The
bridge is obviously too long for just one set of tracks.
Those with astute observation may have noticed an
example of White Van Driver Syndrome here: the driver of this
van, somewhat lost and not wanting to go around the long way,
decided to go through the no entry route, only to encounter a
line of cars coming in the opposite direction. Disappointingly,
he chose to reverse (a punch-up would have been far more entertaining!).
(photo: 2006)
|
The barely discernible hump in the road at Richmond
Way indicating the line of the railway. The building on the left,
built on the line of the railway, is the K West hotel, the back
of which is visible on the right hand side of the photo above.
Why road humps survive when all other railway remains disappear
is something of a mystery. One guess would be that levelling
the road, along with all the utilities (gas, electricity, telephone,
water) that run under the road surface, would be prohibitively
expensive.
(photo: 2006)
|
|
The track bed below Rockley Road. The beam at the
top is one of the joists holding the road up above it.
(photo: 2002)
|
|
The hump on Shepherds Bush Road. The block of flats
is built on the site of Shepherds Bush station. Despite being
closed to passenger traffic in 1916, the station site survived
until the late 1950s/early 1960s. That there was a station here,
explains why the ground floor of those flats is well below the
level of the road.
(photo: 2002)
|
Shepherds Bush station site in 2002.
The block of flats on the far side of the bridge is The Grampians,
built in the 1930s on the line of the railway.
For a photo of the station in 1955, forty years after
closure, move your cursor over the image above.
|
|
|
The site of Shepherd's Bush station as viewed from the bridge in the photo above.
(photo: 2006)
|
|
After Shepherds Bush station, the line ran underneath
what is now the Hammersmith & City line just south of Goldhawk
Road station. This view of that point is looking east.
(photo: 2002)
|
|
From there it straightened and climbed onto a viaduct
running between, and parallel to, the Hammersmith & City
line and Hammersmith Grove.
Nothing now seems to remain of that viaduct - this photo shows
a section truncated at Trussley Road. Even this has now been demolished and there is just raised landscaped earthworks to be seen. A Google StreetView of the area in July 2019 is here.
There was a link between
this line and what is now the Hammersmith & City line just
south of here that allowed Metropolitan line access to Richmond.
(photo: 2002)
|
|
View of the track bed leading back to the edge of
the demolished bridge shown above. This has now been removed.
(photo: 2002)
|
|
A section of the raised track bed slightly further
south from the photo above. This is the location of the junction
with the Hammersmith & City line and presumably why the track
bed is so wide here.
(photo: 2006)
|
|
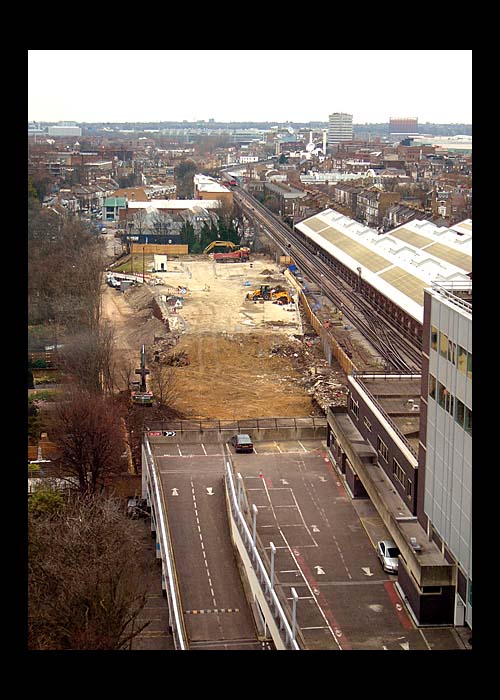
View of the area in the process of redevelopment in Feb 2009. For an approxmate indication of the route of the old track, move your cursor over the image.
Photo: Simon Hargrave. ©2009
|
Hammersmith station on the Hammersmith & City Line. This is the northern end of the platforms; the opposite end from the ticket office and exit. The seemingly pointless footway bridge here is the one that used to connect with Hammersmith Grove Road station. There are no remains at all of Hammersmith Grove Road station.
(photo: 2007)
|
|
South of Hammersmith Grove Road station, the route took a 90 degree
turn
so that it ran west toward Richmond, parallel with King Street (in fact, the start of the turn was where Hammersmith Grove Road station was situated).
The small remnant shown here leads directly to the
point where the District/Piccadilly tracks join it.
(photo: 2006)
|
It's very hard to make it out from this photo but
this is the point at which the viaduct passes over the eastbound
District Line.
(The two inner and most obviously visible tracks are the Piccadilly
line ones. The rail in the very bottom right of the photo belongs
to the District Line westbound).
The viaduct was reconstructed here, in the early 1930s,
to allow for one of the extra tracks for the Piccadilly Line
extension to pass beneath it (even though the new extra track
was used for the District Line). The decision to reconstruct
the viaduct seems a strange one considering that it hadn't been
used for passenger traffic since 1916 (the line was closed completely
only a few years later).
|
|
|
A different view showing the separation of the eastbound District Line more clearly.
(photo: 2006)
|
|
When the District Line was extended west from Hammersmith
in 1877, it used the LSWR rails to Richmond, joining them at
Studland Road Junction, just west of Hammersmith station. This
point (and the remains, as seen here, of the viaduct carrying
the original LSWR line) can still be viewed from passing trains.
The line was electrified in 1906 and doubled up with
a non-electrified line in 1911. Although the District Line was
proving very successful, it was clear that the LSWR (and the
Metropolitan and GWR routes along it) was not, so the non-electrified
line proved to have a short service life (until the arrival of
the Piccadilly Line).
|
|
When the Piccadilly line was also extended westwards
from Hammersmith (in 1932), two new extra tracks had to be built
from Hammersmith station to the point at which the old LSWR tracks
could be intercepted. The two new tracks were built on the outer
sides of the existing District ones (the northern most one was
actually built on the other side of the old LSWR viaduct).
The original District Line tracks (the inner ones)
from Hammersmith to Studland Road junction are now used by the
Piccadilly Line. The train shown here (moving away from the camera)
is a westbound District Line one. The current eastbound District
Line is separated from the other tracks by the viaduct.
For a LSWR sign still in situ on one of the bridges,
click here.
|
|
Westward view from the northern side of the viaduct
showing the merging of the track areas (and Ravenscourt Park
station) in the distance. The added-on nature of the track in
the foreground is apparent here (the eastbound District line
track).
(photo: 2006)
|
|
The track to nowhere: eastward view showing the course
of the original route as it passes over the eastbound District
line track.
(photo: 2006)
|
|
|
View from Ravenscourt Park station of the original route of the line (the grassy bank). The foreshortening effect of the telephoto lens makes it seem that the original viaduct takes a lift-off trajectory but it is actually the newer tracks that take a dip down toward Hammersmith station.
(photo: 2008)
|